Inspired Housewife

Empowering Women to Find Their Happy

  • Home
  • About Amee
  • Life Hacks
    • Cleaning Tips and Tricks
    • Organization Hacks
    • Project Ideas
    • Craft Ideas
  • Healthy Eating
    • Gluten-Free Meals
    • Healthy Slow Cooker Recipes
    • Healthy Desserts
    • Healthy Breakfast Ideas
    • Healthy Dinner Dishes
    • Snacks and Appetizers
    • Kid's Food Ideas
    • Cooking Tips
    • Comfort Food
  • Family Life
    • Parenting Tips
    • Married Life
    • Fitness Mommy
    • Birth and Baby
    • Happy Kids
    • Autism Kids
Home » Healthy Eating » Cooking Tips » How to Make Gluten Free Breading

How to Make Gluten Free Breading

by Amee 2 Comments

Gluten Free BreadingThis is a simple method for how to make gluten free breading:

When I decided to take gluten out of my son’s diet I was overwhelmed by the cost of gluten free products and felt a bit lost lost.  While I searched for substitutes, a girlfriend of mine whose daughter has Celiac disease suggested I use Chex® cereals for my breading because many of them are gluten-free.  Compared to gluten-free bread crumbs the cost was much cheaper.  I was skeptical at first to use cereal, but after one try I became a believer.

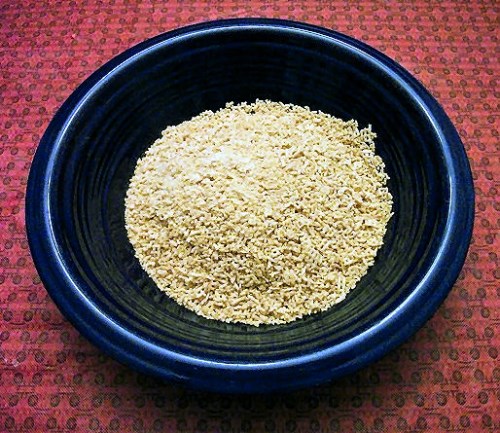
All you need is either a box of Rice or Corn Chex®, a rolling pin, and an air-tight plastic storage container to keep the breading from becoming stale.  I tend to use Rice Chex® more often, because it takes on the flavor of whatever you cook.  I found Corn Chex® are great for fish, chicken, meatballs, lentil roasts, egg plant Parmesan, and many more recipes.  I also use them in cookies to add some flavor.


Gluten Free BreadingInstructions

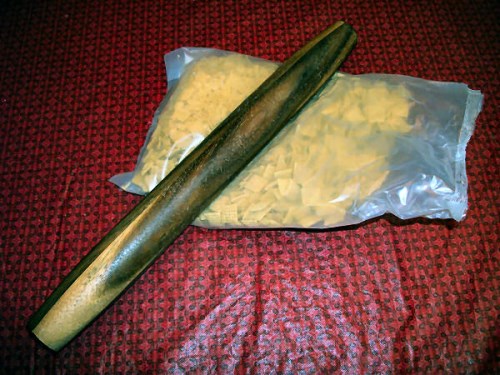
1.  Open your box of Rice or Corn Chex®, remove the bag, and cut a small slit in the corner of the bag to let the air out when you roll.

2.  Lay the cereal in the bag on a hard surface, and use your rolling pin, sauce pan or whatever else you have available to crush the Chex® cereal.  I find the rolling pin works the best, because you can roll it up and down and then side to side until you get the cereal to the consistency you like, whether it be finely or coarsely ground.

3.  Once you have the cereal crushed, pour it into an air-tight plastic storage container, and put the lid on tightly.  When you need breading you have it ready to use.  It is a system that works well for me.

Filed Under: Cooking Tips Tagged With: Gluten-Free Foods

« The Love of a Grandmother
Savory Vegetarian Lentil Roast »
Subscribe
Notify of
guest
Recipe Rating


guest
Recipe Rating


2 Comments
Newest
Oldest
Inline Feedbacks
View all comments

Follow Me!

  • Facebook
  • Instagram
  • LinkedIn
  • Pinterest
  • Twitter
  • YouTube

My Mission and Vision

My name is Amee, and welcome to Inspired Housewife. Through my life challenges of anxiety, depression, childhood abuse, and marriage, I strive for empowering women to find their happy. I envision an empowered woman who overcame her past and present challenges to find her inner beauty, happiness, love, and peace. Read More…

Pages

  • About Amee
  • Disclosures and Disclaimers
  • Privacy Policy

Disclosure

Some of the links on this page are affiliate or third-party advertiser links, meaning, at no additional cost to you, we could earn a commission if you click through or make a purchase. Our Disclosures and Disclaimers page provides further details. Thank you for your support!

Latest Posts

  • How to Clean a Sponge Before it Takes YOU to the Cleaners
  • 7 Easy Decluttering Ideas to Avoid Feeling Overwhelmed Constantly
  • Do You Lack Total Clutter Control? Here’s Why!
  • How to Bake a Sweet Potato Perfectly Every Time
  • An Easy and Effective Method for How to Strip Cloth Diapers

Copyright © 2011-2025 Inspired Housewife® a registered trademark of Onyxium, LLC

wpDiscuz